Seat Frame: Shape Optimization Test

https://www.instagram.com/p/Bs9nyefBxSA/

I wanted to put Autodesk Fusion360‘s Simulation feature to work. I decided to create a block that supports the three legs of a stool and ran the space optimization study over it. Using a plastic like ABS in the simulation and MDF for the legs, I could get an estimate of the stress-contours (best among woods and plastics). I used these as templates to remove excess material and decided to 3D print a piece, a slide in joint/frame for my seat.

Now this is the step which is not the right way to go about testing a part for strength – since plastic has a non-linear Young’s modulus and 3D printed parts are neither really solid nor with uniformity among the layers, FDM is definitely not the way to obtain a test piece (however SLA printed parts fare better in this). But I did it anyway, to see how much this shape could take with a ten percent infill just with the defining walls on the outside making up this part – would anyway be a good indicator.

Surprisingly, everything fit well and the seat was able to take my weight, but because of the lack of joinery, it would wobble and slide out of the fixtures with any movement. So, as a way to keep this piece serving some purpose, I just applied some wood glue to the dowels and jammed them between the legs and the top.

For future, this frame could incorporate a clever locking mechanism for the legs and maybe have a smoother, more organic surface without the very much visible fillets.

Quick Build: Piezo-Pickup Casing

Months ago, when my roommate managed to buy a sweet Fender acoustic guitar from a student who was moving out, I mentioned that he get a piezo-electric pickup. We found the cheapest one on Amazon for about ten dollars, and after receiving it, we realized that we had no way to secure it to the guitar maybe apart from drilling a hole through its body for the output jack. So, the project lay dormant until yesterday. I love small projects like these where excess material can find some purpose.

Sunday – just pulled out a block of pine from my box of materials and took some measurements of the pickup’s components.


Monday – managed to cut a casing with just those measurements (without the pickup as the reference) only to return home and find that some of my estimates were way off.

Tuesday – tried to make this casing again from scratch, having the pickup with me for reference helped cut down the time considerably. Upon coming home, I attached the casing on the guitar with velcro and then decided to utilize the previously failed piece as an extension to it (so that it has more area to stick to and is easier to remove and attach). I plugged in the pickup to my processor and it sounded pretty damn good across most patches. Also reinforced the original wire by wrapping it with really loud “Chenille Stems”.

Wednesday – Glued the previously failed piece to the new casing, sanded down the faces and put some wax to make it shine. Invited my friends to try it out on Friday.


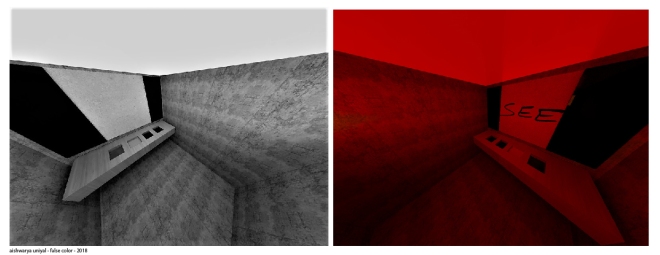
Interactive Art: False Color

This is an idea for an interactive art installation where both the spectators and the performers participate through observation and creation, respectively.  It consists of a booth, like a darkroom used for developing photographs, with a counter has four colors which render as black to the subject in the saturated red light from overhead. The subject uses these four colors to paint a blank canvas in front of him/her. In the end, the piece is given back to the subject – for them to validate against their imagination.  There are one way glass windows on the sides of the canvas through which the spectators on the outside can look inside this booth but only see the canvas’ reflection on the wall behind the performer (not shown in the image).

This piece seeks to initiate conversations and thoughts about the subjectivity of vision, our perception of colors, reality and light.

falsecolor-01

Rendered Errors

Spent a few hours tonight playing around with Fusion360’s rendering service on the lattice I have been trying to create (and print). The results were impressive, especially with all of the reflective surfaces and the ever repeating geometries. One of the renders did fail. It left me mid-way, after an hour’s wait, with something that was incomplete yet cool – straight out of a high school NCERT Physics or Math book!

I will try to post more updates on the project as well.

Lay(er)ing Eggs

With access to FDM 3D printers for a class I was the teaching assistant for, I started with a few quick projects of my own to learn more about this technology. The opportunity couldn’t have come at a better time as I was also taking an engineering course on 3D printing, so there were lots of ideas that I wanted to try.

Nature uses many methods to create which could be classified, in human context, into three types – Additive, subtractive and transformative. All of these are also used in varying degrees by humans, themselves a part of nature, to create new things – we have mostly been using subtractive and transformative methods (like turning a tree log into a chair and making bread and iron) for a very long time in manufacturing; but additive manufacturing is relatively, at least as what it means now, a new process. We have borrowed a lot of ideas from nature in our subtractive processes and have pretty much augmented nature for our transformative processes. Thus, driving the additive methods back to how nature uses them only makes sense.

So, I wanted to 3D print an egg – something absolutely unnecessary, yes. But there is much more to an egg than there is to the generic nuts and bolts or pikachus that get printed as test pieces all the time. Through additive manufacturing, I wanted to study and imitate this structure as it is created in nature, ie. without internal or external supports.

The ovoid is an interesting shape and its properties of strength and stability also make it the subject of many studies and applications. While reading up about eggs (do not ask why), I got to know more about how evolution, local resources and thermodynamics play a key role in determining their shape. The way by which an egg is created within the bird is an interesting process by itself, the tube of the oviduct creates and shapes its shell it as it passes through – an additive process which we might try to replicate in the future as an assembly line which is way more compact and efficient.

Using the thinnest wall thickness possible, I first printed a chicken egg (closest to an ovoid) in PLA which came out just fine, but the slicer put an internal singular support column running through its central axis. I had missed out on enforcing the no support setting so the entire curvature was unsupported except for the top and the bottom. Even with that, it turned out to be super strong and one could throw it at the floor with as much force as possible and the thing would just randomly bounce off in another direction. Interesting.

Next, I printed the same egg but with a meshed or a voronated surface. Voronoi partitioning of a surface finds use in modelling bone architecture, cells, scaffoldings for growing specimens; and it also simply looks cool. This is also probably the closest one can get to generative design like forms without actually using a generative algorithm. These very alien looking eggs took a longer time to print, even with lesser material, because of the discontinuity in deposition and the very gradual and varying slopes which bound each voronoi curve. This too printed without much problems, except for one, which was by my own lack of patience. It printed with a base to which it was attached, I hastily pulled the whole piece without judging its sensitivity and it broke at the bottom. This structure, also printed at minimum wall thickness, was actually very interesting – it flexed and yielded like a sponge but maintained its original geometry. This spongy egg, did manage to give me ideas for another class project I was working on (scaffolding for silicone prostheses).


Now that I was successfully able to 3D print eggs without any (or at least minimal) structural support, both with the solid shell and a voronated one, I can safely say that the this natural shape also accommodates for the slope angles within which a man-made filament extruder works. I am now thinking how this idea would hold if I print these with the stereolithographic process – ie. how does the surface tension of the photopolymer and the vaccuum that it might create for this egg shell affect the results. I feel it might work, but I have to test that.


Some interesting info on eggs:
http://science.sciencemag.org/content/356/6344/1249http://vis.sciencemag.org/eggs/

Click to access egg.pdf

https://web.stanford.edu/group/stanfordbirds/text/essays/Eggs.html
https://news.nationalgeographic.com/2017/06/bird-eggs-shapes-flight-evolution/